reading-notes
React 4
Dynamic Routes
Download Starter Code
npx create-next-app nextjs-blog --use-npm --example "https://github.com/vercel/next-learn/tree/master/basics/dynamic-routes-starter"
You should update the following files:
- public/images/profile.jpg with your photo.
- const name = ‘[Your Name]’ in components/layout.js with your name.
<p>[Your Self Introduction]</p>in pages/index.js with your self introduction.
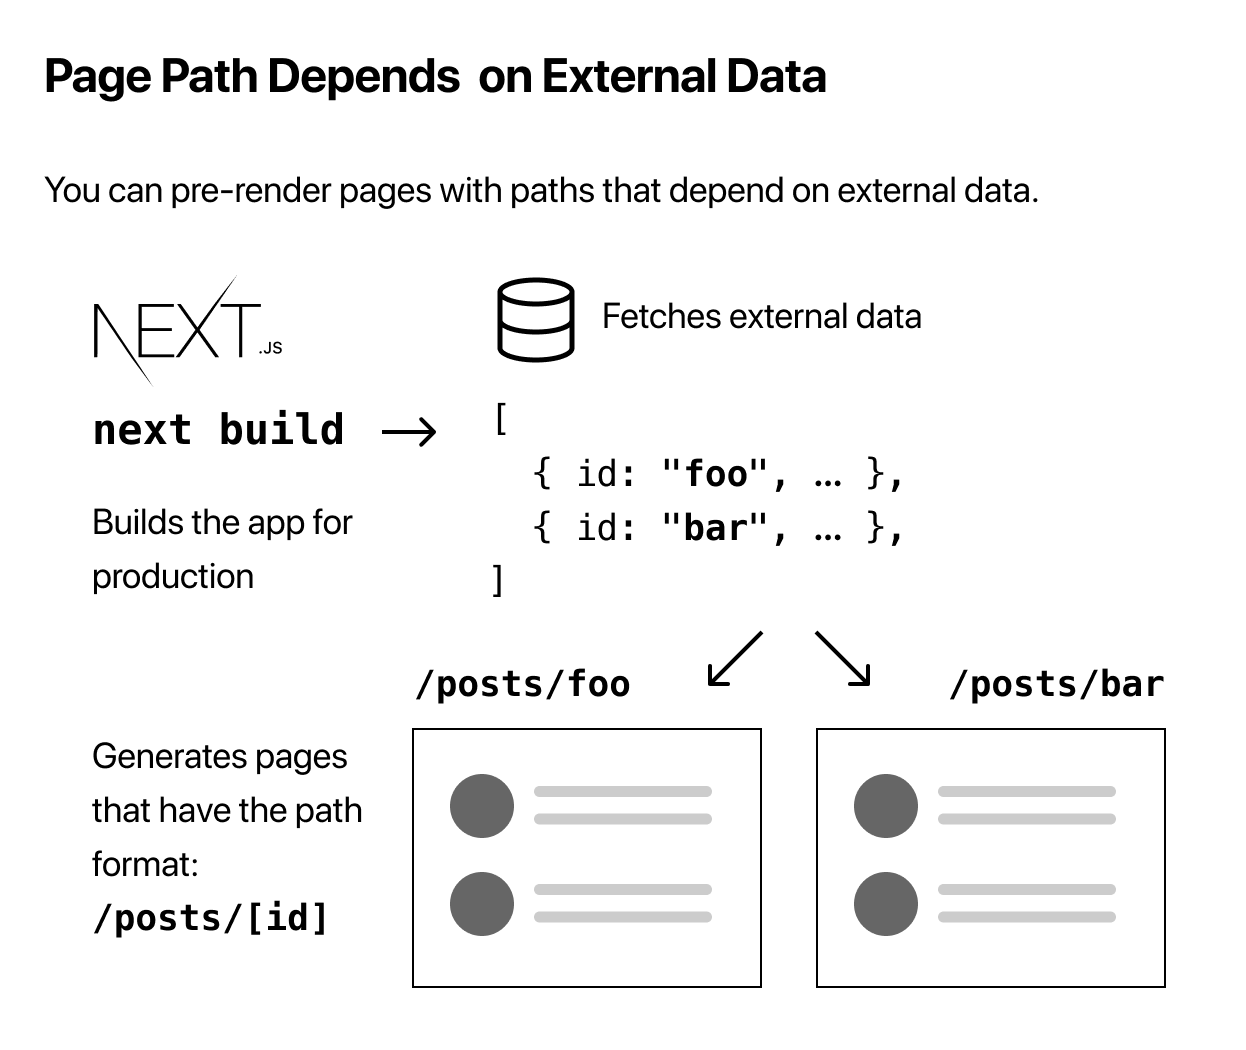
Page Path Depends on External Data

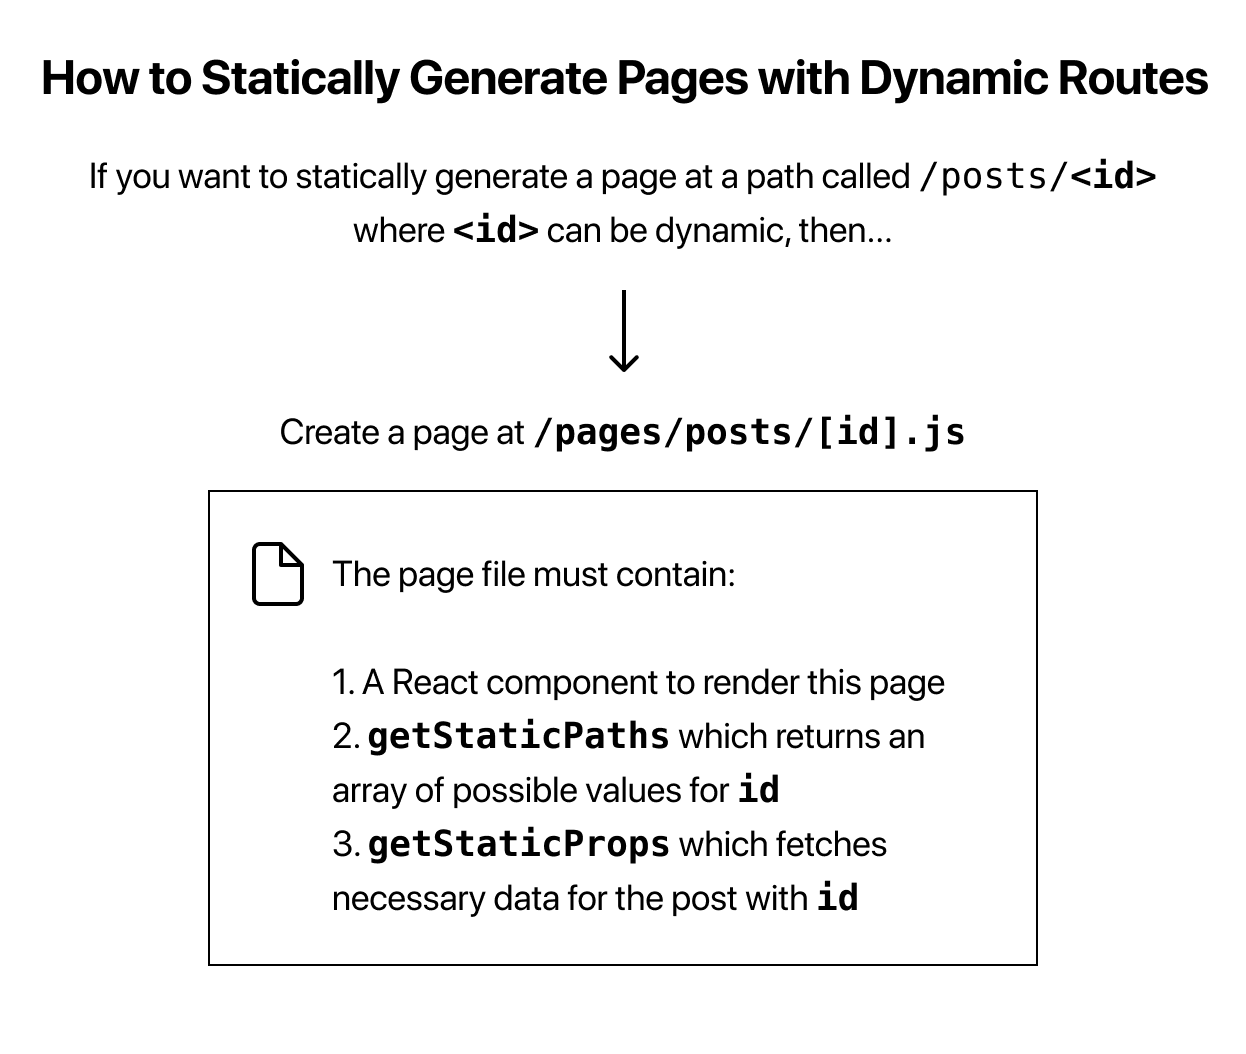
How to Statically Generate Pages with Dynamic Routes
- We want each post to have the path /posts/
<id>, where<id>is the name of the markdown file under the top-level posts directory. - Since we have ssg-ssr.md and pre-rendering.md, we’d like the paths to be /posts/ssg-ssr and /posts/pre-rendering.
In pages/posts/[id].js, we’ll write code that will render a post page — just like other pages we’ve created.
import Layout from '../../components/layout'

export default function Post() {
  return <Layout>...</Layout>
}
Now implement getStaticProps again:
import Layout from '../../components/layout'

export default function Post() {
  return <Layout>...</Layout>
}

export async function getStaticPaths() {
  // Return a list of possible value for id
}

export async function getStaticProps({ params }) {
  // Fetch necessary data for the blog post using params.id
}

Implement getStaticProps
open lib/posts.js again and add the following getPostData function at the bottom. It will return the post data based on id:
export function getPostData(id) {
  const fullPath = path.join(postsDirectory, `${id}.md`)
  const fileContents = fs.readFileSync(fullPath, 'utf8')

  // Use gray-matter to parse the post metadata section
  const matterResult = matter(fileContents)

  // Combine the data with the id
  return {
    id,
    ...matterResult.data
  }
}
If you come across an error, make sure your files have the correct code:
- pages/posts/[id].js should look like this.
- lib/posts.js should look like this.
- (If it’s still not working) The remaining code should look like this.
Render Markdown
To render markdown content, we’ll use the remark library. First, let’s install it:
npm install remark remark-html
open lib/posts.js and add the following imports to the top of the file:
import { remark } from 'remark'
import html from 'remark-html
Then, update the getPostData() function in the same file as follows to use remark:
export async function getPostData(id) {
  const fullPath = path.join(postsDirectory, `${id}.md`)
  const fileContents = fs.readFileSync(fullPath, 'utf8')

  // Use gray-matter to parse the post metadata section
  const matterResult = matter(fileContents)

  // Use remark to convert markdown into HTML string
  const processedContent = await remark()
    .use(html)
    .process(matterResult.content)
  const contentHtml = processedContent.toString()

  // Combine the data with the id and contentHtml
  return {
    id,
    contentHtml,
    ...matterResult.data
  }
}

Polishing the Post Page
Adding title to the Post Page
In pages/posts/[id].js, add the title tag using the post data.
// Add this import
import Head from 'next/head'

export default function Post({ postData }) {
  return (
    <Layout>
      {/* Add this <Head> tag */}
      <Head>
        <title>{postData.title}</title>
      </Head>

      {/* Keep the existing code here */}
    </Layout>
  )
}
Formatting the Date
npm install date-fns
Next, create a file called components/date.js and add the following Date component:
import { parseISO, format } from 'date-fns'

export default function Date({ dateString }) {
  const date = parseISO(dateString)
  return <time dateTime={dateString}>{format(date, 'LLLL d, yyyy')}</time>
}
Fetch External API or Query Database
getAllPostIds (which is used by getStaticPaths) may fetch from an external API endpoint:
export async function getAllPostIds() {
  // Instead of the file system,
  // fetch post data from an external API endpoint
  const res = await fetch('..')
  const posts = await res.json()
  return posts.map(post => {
    return {
      params: {
        id: post.id
      }
    }
  })
}
If fallback is false, then any paths not returned by getStaticPaths will result in a 404 page.
If fallback is true, then the behavior of getStaticProps changes:
- The paths returned from getStaticPaths will be rendered to HTML at build time.
- The paths that have not been generated at build time will not result in a 404 page. Instead, Next.js will serve a “fallback” version of the page on the first request to such a path.
- In the background, Next.js will statically generate the requested path.
Deploying Your Next.js App
Push to GitHub
Before we deploy, let’s push our Next.js app to GitHub if you haven’t done so already. This will make deployment easier.
- On your personal GitHub account, create a new repository called nextjs-blog.
- The repository can be public or private. You do not need to initialize it with a README or other files.
- If you need help setting up your repo, take a look at this guide on GitHub.
Then:
- If you haven’t initialized the git repository locally for your Next.js app, do so now.
- Push the Next.js app to your GitHub repository.
Deploy to Vercel
Vercel is a serverless platform for static and hybrid applications built to integrate with your headless content, commerce, or database.
Create a Vercel Account
- Import your nextjs-blog repository
You can use default values for the following settings — no need to change anything. Vercel automatically detects that you have a Next.js app and chooses optimal build settings for you.
- Project Name
- Root Directory
- Build Command
- Output Directory
- Development Command
When it’s done, you’ll get deployment URLs. Click on one of the URLs and you should see the Next.js starter page live.
Next.js and Vercel
Vercel is made by the creators of Next.js and has first-class support for Next.js. When you deploy your Next.js app to Vercel, the following happens by default:
- Pages that use Static Generation and assets will automatically be served from the Vercel Edge Network, which is blazingly fast.
- Pages that use Server-Side Rendering and API routes will automatically become isolated Serverless Functions.
Vercel has many more features, such as:
- Custom Domains
- Environment Variables
- Automatic HTTPS
After deploying to Vercel, try doing the following if you can:
- Create a new branch on your app.
- Make some changes and push to GitHub.
- Create a new pull request.
Develop, Preview, Ship We’ve just gone through the workflow we call DPS: Develop, Preview, and Ship.
- Develop: We’ve written code in Next.js and used the Next.js development server running to take advantage of its hot reloading feature.
- Preview: We’ve pushed changes to a branch on GitHub, and Vercel created a preview deployment that’s available via a URL. We can share this preview URL with others for feedback. In addition to doing code reviews, you can do deployment previews.
- Ship: We’ve merged the pull request to main to ship to production.